


My new tutorial


This tutorial was made in PSP 9, but you can also be done witn other versions of PSP

*Filters unlimited 2.0 - Tile & Mirror
*dsb Flux-Linear Transmission
*L en K's-Zitah
*Alien Skin Xenofex 2-Lightning
*Filters unlimited 2.0-Photo Aging Kit- Photo Frame 2Plugins download:


-Copy the the selection files to the Selections folder of PSP
-Copy the the texture files to the Textures folder of PSP
Colors:

Ders aşamalarını aşağıda gördüğünüz çubukla takip edebilirsiniz.
-Copy the the texture files to the Textures folder of PSP
Colors:

Preview


So let's start
1-Set the Foreground to #b1196f dark
And the Background to #f3c3dd light
Switch the foreground color to gradient
2-Color palette
Set your foreground and background to foreground / Background gradient
Styl:Linear
Angle:0 Repeat: 1

3- Open a new transparent image 850 X 550 pixels.
Fill with the gradient
4-Filters Unlimited 2.0 - Tile & Mirror - Kaleidoscope 1

5-Selections-Select all
Selections-Modify- Contract 40 px.

6-Layers-New Raster layer(Raster 2)
7-Flood fill tool
Fill with Foreground color: #b1196f dark

8-Selections-Modify- Contract 2 px.
Delete
Color palette- Change the Foreground color to: #27c795 Green
Keep the same Background color light
9- Color palette
Gradient
Linear Angle:0 Repeat: 1
Flood fill tool
Fill the selection with gradient
Fill the selection with gradient

10-Selections-Modify- Contract 15 px.
11- New raster layer (Raster 3)
Ildiko’s background-Edit-copy
Edit- Paste into selection
Selections-Select none
12-Effects-Edge effects-Enhance
Layers- Duplicate (Copy of Raster 3)
13-Effects-Plugins
dsb flux- Linear Transmission(5-7-50- vertical)

Adjust-Sharpness-Sharpen
14-Effects-3D effects-Drop shadow (2-2-55-3)

15-Layers-New raster layer
16-Selections/- Load/ Save selections
Load Selection from disc- Pinkparadise

17- Repeat step 7- 8 and 9
18-Double click on this layer and set Blend mode to overlay
Effects-3D effects-Drop shadow (2-2-55-3)
Keep selection

19- New raster layer(Raster 5)
Open paysages-copy-paste into selection
20-Selections-Select none
21-Open deco 1
Copy-paste as new layer(Raster 6)
22-İmage-Resize 90

Double click on this layer and set Blend mode to Dodge

23-Open butterfly deco
Edit-Copy-
On your work image
Edit-paste as new layer(Raster 7)
24-İmage-Resize 90
Blend mode:Overlay
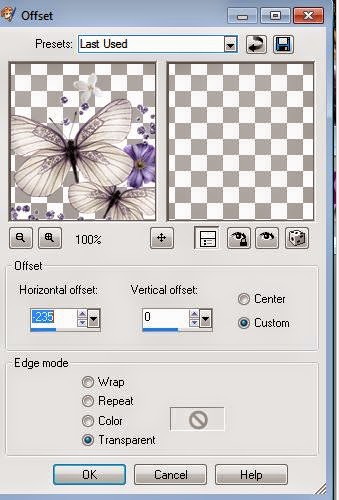
25-Effects-İmage effects- Offset (-235/0)
26-Click to Raster 1 ( activated)
27-Effects-Plugins
L en K’s Zitah

28-Click to Raster 1 ( Stay in the first layer )

29-İmage-Canvas size
Width 950 px. Height: 650 px.
OK.

30- New raster layer (Raster 8)
Selections-Select all

31- Open Ildiko’s background-copy
Paste into selection
32-Blend mode: Overlay
Selections-Select none

33-İmage-Add borders 1 px. #f5cff2
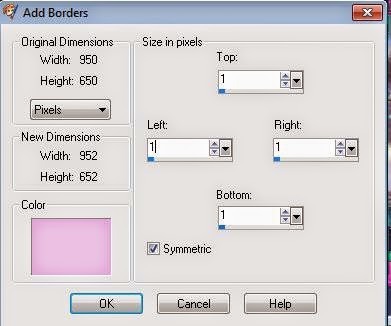
İmage-Add borders 20 px. #a737a0

34-Magic wand
Prepare the settings you see in the figure below

Click on the last frame
35-Effects-Texture effects-Texture

Find- Texture 23

36-Effects-Edge effecys-Enhance
Selections-Select none
37-Effects-Plugins
Alien Skin Xenofex 2- Lightning

Prepare the settings you see in the figure below

38-Open Angel tube
Copy-paste as new layer (Raster 1)
Resize if necessary with İmage-Resize
39- Double click on this layer and set layer Opacity to 48

40-İmage-Add borders 1 px. #f5cff2
40-Layers-Duplicate
İmage-Resize 90

41-Click to bottom layer

Effects-Plugins-UnPlugged Tools- İnterlace


42-Open deco: World -Copy
Click top layyer- Paste as new layer
43-İmage-Resize 90
44-Place the left lower or place it wherever you want
( Use a bit of shade if you use something else - with Effects-3D effects-Drop shadow )
45-Open woman tube
Copy-paste as new layer
46-İmage-Resize 85

47--Place the right or place it wherever you want
48-Effects-3D effects-Drop shadow (5-5-55-6)

49-Put your name or watermarkt
50-Open text
Copy-Pate as new layer
Place it wherever you want
51-İmage-Add borders 1 px.#000000 Symmetric
52-İmage-Add borders 10 px.white #ffffff Symmetric
53--Filters Unlimited 2.0 - Photo Aging Kit
Photo Frame 2- Apply

54-İmage-Resize
Width: 900 Height::600 pixel
Lock aspect ratio: unchecked
OK.

55- Save as JPEG
This is my result

I hope you enjoy
Thank you.
Müşerref Özdaş
Extra example:

Extra example:
İf you wish yo can post your result on my Facebook page.

contact:


Thank you Franie

Thank you Franie

Thank you Harmi

Manzara ve kadın tube: Asi Menekşe
Teşekkür ederim Menekşe

Thank you Morela

Thank you Marley

Thak you Coby

Thak you Helma (Whitelady)

Teşekkür ederim Aytül.

Thank you Altair

Thank you Brigittealice

Thank you Valy

Thank you Mamy Annick

Thank you Geertje

Thank you Brigittealice

Thank you Marrie

Tubeler: Caroline ve LuzCristina
Thank you Truus

Thank you Monique
Tüm versiyonları görmek için >>> buraya tıklayınız.